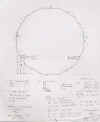

Build @ your own risk. I Michael Haines of Classic
Restoration assume zero responsibility to these plans, rotisserie and all
person's using them. I have donated my time and ideas for free to make better
your busses. Please apply common sense when building this contraption, and
Safety first!
Plan of assembly:
I built this from $50. in scrap materials. I estimate new
material cost @ $140. This design was ideal for transporting use. Other
rotisseries may be more appropriate for in place rotation. My design is simple
and builder friendly. Take your time and study the plans. You will need a
welder, welding mask, 1/2 drill, 1/2 inch drill bit, chop saw or cutting devise,
tape measure, thick leather gloves, safety goggles and possibly a calculator.
Step one: Build a 30 degree jig out of 2 x 2 angle iron; Weld the two 23 inch
angle iron sections (long point to long point) with 15 degree cuts @ a perfect
30 degree angle. To verify true degree reference length of A sq. + B sq. = C
squared.
Step two: Cut your red or yellow wall 2" x 2" tubing @ 15 degree cuts
to length. Mark all lengths, 21 inches and 23 inches. (Please see foot note).
Pair the correct to plans sections in two, double check and make minor
adjustments if needed. Break the rotisserie into a top and bottom, each should
share parallels angles and one side. Using Jig, weld pairs, then weld pairs
together. Now you have a complete multigon making a 360 degree circle, I.E. 12
30 degree angles make 360 degree multigon. Repeat this step for second multigon.
Step three: Cut your multigon "B" to a top and bottom, note location
to plans. Insert "b" solid stock in bottom half and weld in place @
all four locations. Slide top half of multigon back in place and drill out a
hole for a holding pin. Remove top half.
Step four: Weld "A" in place. Note "a" (receives a 2 inch x
2 inch tubing)
Step five: Make your mounting bracket arms and plates. Mount the plate's (flat
1/2" steel plate) in place on your vehicle, and get ready for some
muscle work. Slide the arms in place on the multigon. Raise the vehicle to C.P.G.
(center point of gravity). Raise the bottom half multigon with all in place,
steady the bottom half w/ tack welded temporary stabilizer. Weld the arms
"C & D" to the 1/2 plate that is bolted on your bus. Note: the
bracket arms should be removable from the "A" pockets. Note:
"c & d" were designed for barndoor bus, when building rotisserie
for non barndoor; mount plates in place and correct the dimension width on arms
prior to welding. Allow 1/2 inch of total play.
Step six: Build a safety bar. See jpg. This is very important. You don't
want the bus rolling back on your ass or squashing your precious hands! Please
note safety bar jpg. Use this bar.
Step seven: Lift the top half's of the multigon's in place and safety pin. Roll
that bus over, safety bar the position and fix that nasty rust to factory
standards. If its worth doing, do it right!
Foot note: 21 and 23 inch length's can all be changed to 23 inches. This will
simplify the layout but make the overall height taller and you should consider
the height of your garage opening prior to making this change.
Best of luck
M i c h a e l H a i n e s
5 4 1 7 7 0 7 4 1 1